I've been automating the firmware update process for the Dell PowerEdge R710-series of servers. The intent of this automation is to ensure that all servers in the data centre have the exact same firmware levels, and to ensure that the automated installation of VMware ESXi on the servers will successfully complete without human intervention.
Before automating this process, I first had to understand how the manual Dell firmware update process was performed. I was disappointed to find that the firmware update process for Dell servers was poorly documented, not reliably reproducible (the anathema of scripting and process automation) and simply downright buggy.
The process was not as straightforward as I thought it would be: how hard could it be to update the firmware of a commodity Dell server? Well, it turns out that many Dell R710s ship with an expired Lifecycle Manager certificate, which prevents the application of Dell updates signed after a certain date! The process involved:
1) Updating the iDRAC firmware
2) Updating the expired Lifecycle Manager certificate using a Lifecycle Manager Repair Package
3) Updating other firmware within the server
There are bugs in the installation of Dell Update Packages (DUPs). If at first the DUP doesn't apply, just try again! I've pointed out where this occurs to help you script around it. It's fairly disappointing from Dell: after eleven generations of servers, Dell still haven't figured out how to streamline the firmware update process. Oh well. If Nutanix eats your lunch, don't act surprised.
To proceed, you'll need to have made an update repository using the Dell Repository Manager.
Step 1. Download the latest iDRAC6 firmware
If you go to the iDRAC6 page on the Dell TechCenter, you'll have a choice between downloading a monolithic or blade version of iDRAC. Because you are upgrading firmware on an R710 (rackmount), you'll want the monolothic version. Monolithic is Dell's term for standalone server as opposed to blade server.
The latest version of the Dell iDRAC 6 is v1.98 and the filename is firmimg.d6. You can download it here.

Step 2. Download the Lifecycle Manager Repair Package (only for Dell R710)
If you have a Dell PowerEdge R710, the certificates used by the Dell Lifecycle Manager have expired. Lifecycle Manager is a component on Dell servers that manages the application of firmware updates to the BIOS, motherboard, network adapters, et cetera. If you try to apply any updates without applying the Lifecycle Manager Repair Package, you'll get the error message "The updates you are trying to apply are not Dell-authorized updates."
The latest version of the Dell Repair Package is V 1.5.5, A0 and the filename is BDF_1.5.5_BIN-12.usc. You can download it here.
Step 3. Update the iDRAC firmware
The iDRAC firmware needs to be updated to at least 1.97 so the Lifecycle Manager Repair Package can be applied. Updating iDRAC firmware can be done remotely or via the console (if you feel like freezing to death in your data centre/server closet/broom closet).
Step 3.1. Log into the iDRAC
If you don't know the password for your Dell iDRAC, try the default password combination.
Username: root
Password: calvin
I'm not sure who Calvin at Dell is. I might check on LinkedIn later when I'm waiting 40 minutes for a firmware update to complete.

Step 3.2. In the iDRAC, click iDRAC Settings (in the left menu bar)
On this page, verify the iDRAC firmware version.

Step 3.3. Click on the Update tab
For the record, Google Chrome on Mac works for uploading files.

Step 3.4. Select the iDRAC update package.
Click Choose File, and select the iDRAC update package downloaded in step 1.
The latest iDRAC 6 update package should be called firmimg.d6

Step 3.5. Confirm the old and new version, then click Next
Verify that the New Version is newer than the Current Version, then click Next.

Step 3.6. Wait for the iDRAC Firmware Image to be updated
This typically takes less than 5 minutes. After the iDRAC firmware is updated, the iDRAC will restart and may become unresponsive for a minute. You will need to login again.

Step 3.7. Verify the new iDRAC version has been installed
Once the firmware update is complete, log into the iDRAC again and verify that the existing iDRAC version matches the new version.

Step 4. Repair the Lifecycle Manager (for R710 only)
Updating the Lifecycle Manager will allow you to apply firmware updates to the rest of the system. You must have an iDRAC firmware version of at least 1.97 to continue.
Step 4.1. Upload the Lifecycle Repair Package
In the iDRAC interface, go to the Firmware Update screen and upload the Lifecycle Repair package. The filename should be BDF_1.5.5_BIN-12.usc.

Step 4.2. Confirm the package name
The package name should be System Services Recovery Image. Click Next to continue.

Step 4.3. Confirm upload
Click OK to proceed with the update.

Step 4.4. Wait for the Lifecycle Manager to update
It is common for the update to be stuck at 10% for approximately 3-4 minutes.

Step 4.5. If the upload fails, restart the iDRAC.
It is common for the update to fail. If this is the case, try applying the update multiple times. It is not uncommon for the update to take 3-4 attempts. If applying the update still fails, restart the iDRAC and try again. The link to restart the iDRAC is in the Quick Links section on the System Summary page.

Step 4.6. Complete update
When the update is complete, leave the iDRAC open. You may need to use it.

Step 5. Update the remainder of the server firmware
Lifecycle Controller allows you to update the other firmware in the server. This includes
- Diagnostic utilities
- Dell Lifecycle Controller
- BIOS
- PERC 6/i Integrated (Embedded)
- Broadcom NetXtreme II Gigabit Ethernet (Embedded)
Here's an image of the typical firmware components that can be upgraded on a Dell server.

Step 5.1. Boot the server to the Unified Server Configurator
When the server is booting, press F10 to boot to the Unified Server Configurator. Dell also labels this as System Services.
If you have pressed F10 in time, you will see the message Entering System Services. To cancel, enter the IDRAC6 Configuration Utility
You can skip the memory test by pressing Esc.

Step 5.2. Wait for Unified Server Configurator to start
This can take several minutes.

Step 5.3. Start the Platform Update
You see the message reading "Warning: A system update is recommended since some components are potentially out of date. Please go to Platform Update to view and run availabile updates."? It's useless. It always appears due to a bug in the way Dell compares version numbers for the PERC 6/i.
At the Unified Server Configurator screen, click Platform Update.

Step 5.4. Launch the Platform Update
On the Platform Update screen, click Launch Platform Update.

Step 5.5. Select the update repository source
If you have a small number of servers (less than 5), it is easier to update via USB. Updating via FTP server or network share is possible, but introduces complexity: there needs to be appropriate network connectivity and credentials configured.

Step 5.6. Select the source
You need to have a repository file or folder that contains all the Dell updates relevant to your server. Repositories are created using Dell Repository Manager.

Step 5.7. Confirm use of the existing catalog file
This error is normal and will appear for any ISO created by the Dell Repository Manager. Click Yes to continue.

Step 5.8. Wait for the image to be verified
This can take up to 2 minutes. They're not lying.

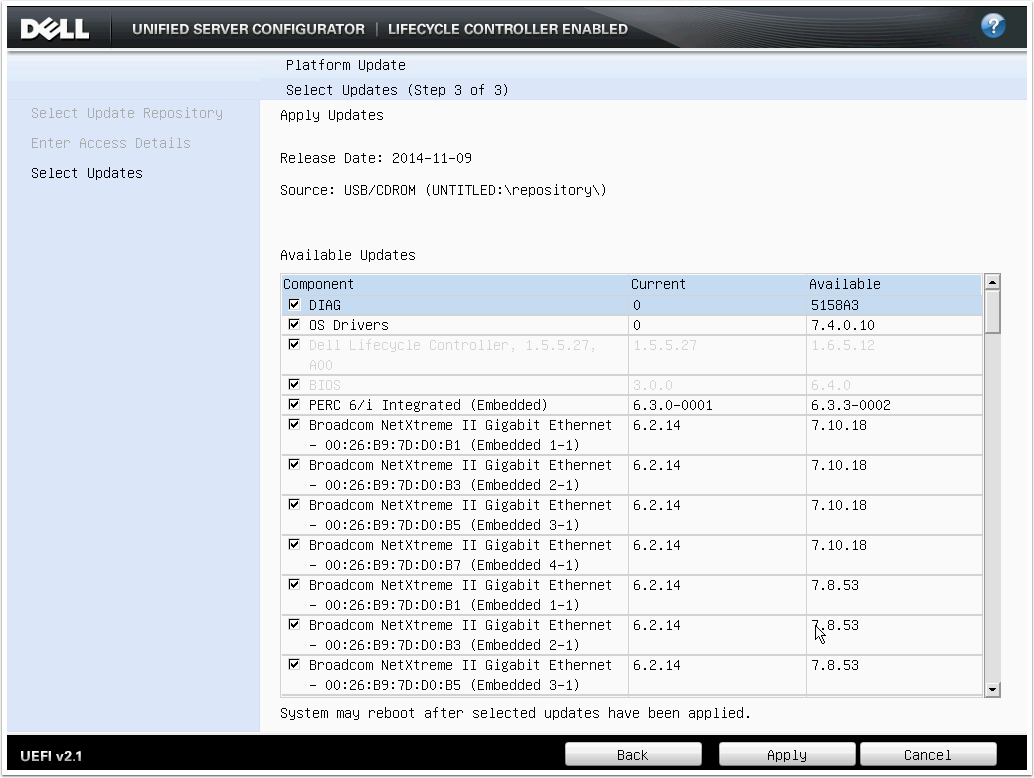
Step 5.9. Review the list of firmware updates to be applied
When you have reviewed the list of firmware updates being applied, click Apply to begin.
Step 5.10. Wait for all Dell Update Packages (DUP) to be copied and verified

Step 5.11. Wait for the updates to be applied
This can take up to 45 minutes. The elapsed time may freeze: this is normal. During this process, there will be multiple reboots. Do not interrupt the reboots. You may click Esc to cancel the memory test during the reboots to speed the process.

Step 5.12. Wait while the server reboots multiple times
During the reboots, the screen may be blank for several minutes. This is normal.

Step 5.13. Wait to be returned to the Unified Server Configurator screen
Wait to be returned to the Unified Server Configurator screen.
Step 5.14. Verify that all updates have been applied
When all updates have been applied, the server will return to the Unified Server Configurator screen. You can verify that updates have been applied by comparing the Current version with the Available version. These should be the same, with the exception of the PERC 6/i Integrated (Embedded). Due to a bug in the way Dell compares the versions, it will appear as requiring an update (the PERC 6/i reports it version as 6.3.3.0002, while the update package has the version 6.3.3-0002 which it thinks is older). A messaging saying everything is up to date would have been nice, but hey, that'd require a focus on the user experience!
If all the updates have been applied successfully, click the Cancel button.

Step 5.15. Exit the USC
At the Unified Server Configurator screen, click Exit and Reboot to boot the server normally.
Step 5.16 Confirm the exit
Click Yes to exit the USC.

And there you have it: an updated Dell PowerEdge R710 server! Next step: automate it.